How to Set Up Rich Pins on Pinterest
If you want to use Pinterest to draw targeted traffic to your site, you need to set up rich pins. It’s a reasonably simple process (when you know how) but it can be daunting if you’re not used to dealing with bits of code.
I’ll walk you through every step so that you can enable rich pins and start getting easy Pinterest traffic.
What are Rich Pins?
The biggest benefit of rich pins is that the pin looks slightly different. The tagging allows Pinterest to pick up the title of the article and add it to the bottom of the pin. This means that your pin takes up more space in the “sea of pins”. Always a good idea!
Also, you need to validate your website to get rich pins which mean that rich pins are more likely to come from a quality site. This of course isn’t a fail safe but there are many pinners who will ONLY pin rich pins.

The Steps to Set Up Rich Pins
There are several steps to setting up rich pins, but once you’ve enabled them, Pinterest will automatically create rich pins (as long as your meta tags are correct.)
You don’t need to do anything else, once you’ve been through the process of setting them up. Everyone who pins from your site will create rich pins (unless YOU opt out by adding some specific code.)
The steps to enable rich pins:
- Apply for a business account.
- Validate your site.
- Add metatags to ALL your pages.
- Apply for rich pins.
Let’s have a look at each step in detail.
How to Apply for Rich Pins Video Tutorial
Benefits of a Pinterest Business Account
If you're using Pinterest for your business, (which includes a blog that isn't currently making a profit but will soon) you need to have a business account. It's in the Terms and Conditions!
The benefits of a business account are huge though!
You get access to analytic which is amazing and tells you which of your pins are doing well.
Plus you can apply for rich pins.
Before you can sort out rich pins, you need to get your business account sorted out.
Apply for a Business Account
Applying for a business account is super easy. If you intend to make money in any way from your site, then you should have a business account.
Having a business account also opens up analytics to your Pinterest account and allows you to apply for rich pins.
You can either convert your personal account or start from scratch.
Validate Your Site.
You need to validate your site so that Pinterest knows that it actually belongs to you.
Once it is validated any pin from your site will have your profile picture on it. (Hooray!)
You’ll also get access to YOUR website analytics i.e. all the pins that come from your site (regardless of who pinned them.) This is SUPER useful information. (Thank you Pinterest, we love you!)
Before you start, I want you to take 5 deep breaths because if you aren’t used to bits of code, this will seem a little scary. But if I can do it, so can you!
There are 2 ways to validate your site.
- With metatags.
- By uploading a html file.
Say what??
If tech jargon leaves you quaking in your boots, I suggest:
- Find a friendly techie person to help you.
- Pay a professional to do it for you.
- Man or Women Up. Take it slowly. You can do it! (And Pinterest has really easy step by step actions for you to take that I will explain for you.)
Using Meta Tags to Validate Your Site
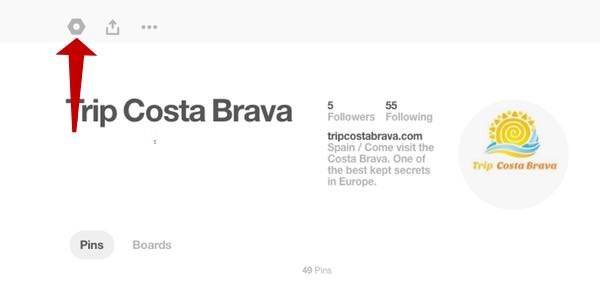
- Click the cog to go to settings.
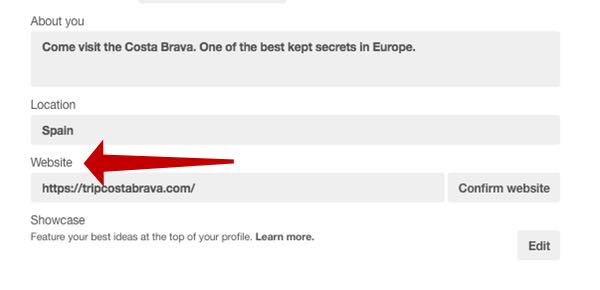
- Go to “website” section in settings.
- Click “confirm website”.
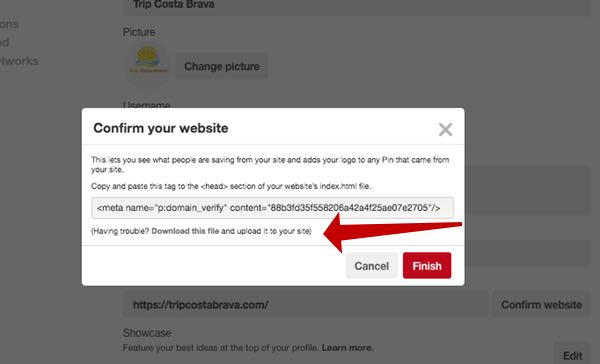
- Copy the bit of code they give you into the <head> section of your website’s index file.


Don’t panic!
What is an “index file”? Essentially it’s your home page.
(I have to confess, my coder husband has just explained the “index” bit to me and I’m none the wiser. All you need to know is how to find it. It’s normally called “index.html” but you may have more than one. You want the MAIN index file.
(If it’s not called “index”, then I presume you’ve changed it so you know more about it than me!)
The <head> section is the bit at the top that has lots of bits that load but that you don’t actually see e.g. Pinterest verification codes or GA verification codes.
You need to paste that bit of code between the start <head> and the end </head>. That funny little line means “finish”.
Remember to save and “deploy” or whatever you do to make things live on your site.
- Go back to Pinterest and press “finish”.

Congratulations, you’ve just done your first bit of coding!
Using html to Validate Your Site
The first 3 steps are the same.
- Click the cog to go to settings.
- Go to “website” section in settings.
- Click “confirm website”.
- Then click “download this file”.
- Upload the file to your website at the root folder (which may look like “public” or “root”).
- Go back to Pinterest and press “finish”.
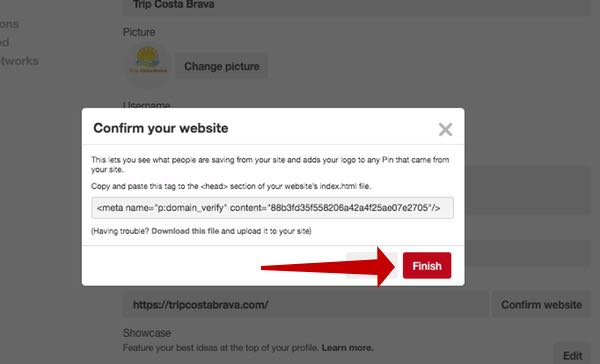
Pinterest supplies instructions by popular hosts.
Add Metatags for Rich Pins
Before you apply for rich pins, you need to make sure that your page is giving Pinterest the information that it needs to create the rich pins.
You’re going to do that by adding meta tags to EVERY page that you want a rich pin to be on.
You can do that by adding the meta tag into the template of your page and filling it in when you create your post.
Yoast is a popular plug in that will do it for you.
The tags are going to go in the <head> of your page. (Just like before but on each separate page rather than in the index.) They appear between the open head tag <head> and the close head tag </head>. The page will load the head, but there isn’t anything for your reader to see.
There are 4 different types of rich pins and each one has slightly different tags that it needs.
You can have more than one type of rich pin within your site but you need to make sure that each page has the correct tags for that type of rich pin.
Article Rich Pins

Product Rich Pins
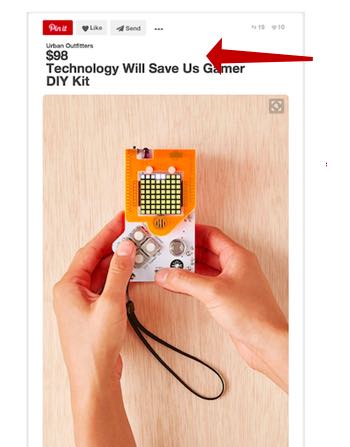
Recipe Rich Pins
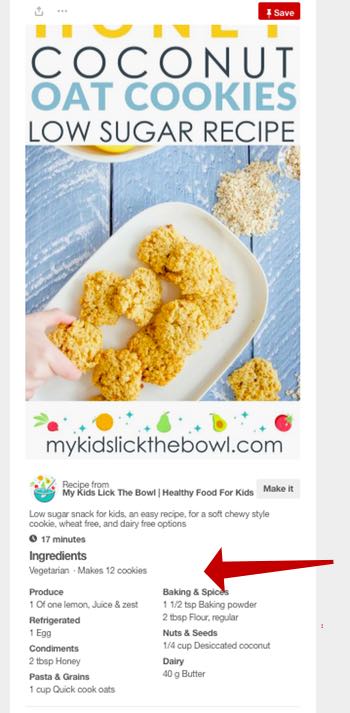
There is currently a debate amongst food bloggers about recipe rich pins. Some people argue that it's better to have normal pins that don't show the entire recipe so that people have a reason to click through to your site and get the recipe.
App Rich Pins
App Rich Pins are for iOS apps and will take you to the Apple Store.
Rich Pin Meta Tags
You can use either html tags, oEmbed or Shopify tags.
Pinterest gives you a list of all the different tags that you need for each pin.
Once you’ve sorted out your meta tags, you’re over the worst.
The last step is easy.
Applying for Rich Pins
Once you have your meta tags in place, you need to apply for rich pins.
You only need to do this with one page.
Go to the validator, add your url and click “validate”.
Pinterest says that you will have rich pins within the hour.
After that ALL pins will be rich pins as long as you have the correct metatags in place and haven’t opted out by adding the opt out code.
My Rich Pins Don’t Work
If it doesn’t work, it probably means you haven’t put the correct meta tags in the correct place. In which case, go back to the beginning and go through the instructions again looking for where you have gone wrong. Code is REALLY pernickety and if you have a dot, dash or any symbol out of place, it won’t work.
You Now Have Rich Pins
Once you have rich pins enabled you can sit back and relax. That’s the most complicated bit of getting easy pinterest traffic. Now you just need to create amazing pins that talk to your target audience.
Now Create Amazing Pins!
Now you're all set up to create amazing pins that will talk to your target reader and bring the traffic you want to your site.
If you'd like some help getting started, check out my hand out "Anatomy of a Viral Pin". Just sign up and you'll be sent the hand out in the post.
Why aren't you getting the traffic you want from Pinterest?
Get the cheat sheet and create a plan of action!
No spam and you can unsubscribe whenever you like.
